Getting Strong, Sexy Legs, Glutes, and Abs with the Front Squat: Excerpted from Kettlebells for Dummies
Sarah Lurie, RKC
August 26, 2010 07:40 AM

Before I started using kettlebells, I was a traditional weight lifter for nearly ten years. Needless to say, I spent many hours in the gym each week trying to get strong but feminine legs and glutes. When I discovered kettlebells, I was amazed at the results I got within the first six weeks of training, especially in my legs and glutes from the kettlebell front squat. And the results came by spending less time in the gym — imagine that!
Your goal for the kettlebell front squat is to get into the rock-bottom position (butt touching heels) with good form. What's good form? Think about this: Do you remember when you were a kid playing on the ground or in the sandbox? Children spend a lot of time in the rock-bottom position throughout the day. Unfortunately, with time and age, many people lose that ability. Some of you may have been told by other fitness professionals that squatting past 90 degrees is dangerous. When my clients give me a response like this one when I tell them to get into rock-bottom position, I usually say, "Well, the toilet is past 90, so I know you can do it!" Don't worry if you don't know what I mean by rock-bottom position — the kettlebell front squat shows you how to get there.
The front squat makes it much easier for you to move and prevent injury when doing everyday chores, like gardening, playing with your kids, or picking up heavy things. A couple of added benefits are the strong, nice-looking legs and glutes you'll see thanks to your new exercise. (Do you remember when you had those cute little dimples in your rear end? Well, you can get those back with a combination of front squats and swings — kettlebellers refer to the end result as the "bell butt.")
And don't forget the abs! Although many people don't think of the squat as being a core exercise, if you use proper breathing techniques and good form, the front squat can be a real ab burner. I don't think I've done a single sit-up since I started using kettlebells, and my abs are more defined (except now that I'm pregnant!), leaner, and stronger than I ever thought they could be.
Settling into the right start position for the front squatWhen you perform any variation of the front squat, with or without a kettlebell, you start in the same position (see Figure 8-1): Stand with your feet slightly wider than shoulder width apart, your toes pointed slightly out, and your arms down at your sides.
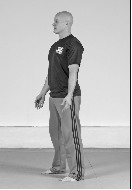
Figure 8-1: The correct start position for the front squat.
Practicing the front squat without the kettlebell
To perform a rock-bottom squat safely and with good form, you should practice without the kettlebell first. The following simple exercise can help you assess how good your squat form is right off the bat.
<Remember>Proper breathing is a must to protect the spine and core during the front squat. Take a deep sniff in through the nose as you descend, and forcefully exhale as you come up, fully engaging your core as you do so.
To do the practice front squat without a kettlebell, begin in the start position I describe in the "Settling into the right start position for the front squat" section and follow these steps:
- Bring your arms out in front of you, and, with your weight on your heels, sit back into your hips and let your knees bend as you slowly pull yourself to the ground. The goal here is to hit rock bottom (butt touching heels), but if your flexibility and form don't allow you to do so, squat as far down as your current flexibility level and form let you go. Remember to keep your spine neutral throughout this movement.
- With your weight pushing through your heels and your knees and core stable, drive up to a fully standing position, with your spine tall and glutes pinched. As you drive up through the ground, be sure to generate force from the ground up and snap your hips to make the squat even more effective.
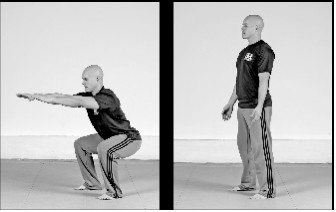
Figure 8-2: The practice squat without the kettlebell.
Repeat the practice squat without the kettlebell for ten repetitions.
If you were able to get to rock-bottom position without the kettlebell, you're ready to move to the front squat with the kettlebell, which I describe in the next section. If you weren't able to get into rock-bottom position, try the following simple exercise. It's almost always effective in getting new students to a rock-bottom squat without having them go through the corrective techniques.
<Warning>Don't ever use a kettlebell for this exercise because it requires you to breath through your sticking points (the points at which you get stuck in the squat without being able to go any lower) throughout the squat, and you shouldn't do so while using weight. Continually releasing air from your diaphragm during this exercise puts your core in a vulnerable position and can result in injury if you try to use your kettlebell.
To do this practice exercise, begin in the start position I describe in the "Settling into the right start position for the front squat" section and follow Step 1 of the front squat without the kettlebell exercise; then continue with these steps:
- Find your sticking point — the point where you can no longer get any lower — and hold your squat. Keep your spine neutral throughout this movement
- As you hold the squat, take a deep inhale through your nose, and, as you exhale, sink deeper into your squat.
- Continue exhaling through each sticking point until you fully reach your rock-bottom position.
- After you reach your absolute rock-bottom position, with your knees and core stable, drive up through the heels to a fully standing position, with your spine tall and glutes pinched.
Repeat this practice exercise for five repetitions.
<Tip>You may feel like you're going to fall back on your butt as you approach rock-bottom position. If you do, you can have a partner hold your hands as you go down or use a sturdy door handle for assistance, but don't rely on your partner or the door handle for more than guidance for getting down or coming up. Use your own strength!
Performing the front squat with the kettlebellSome people who come to my gym don't understand the significance of achieving rock-bottom position in their squats, and, although they could get into position if they really focused, they don't. I recommend you hit rock bottom when you do the front squat with the kettlebell because doing so gives you so much more definition in your legs and glutes and strength in your core than when you go just 90 degrees in your squat. If you still aren't convinced, take note of all the times you squat down to the ground over the next week — wouldn't you rather do so with good form so you can prevent injury?
<Tip>Your hip flexors are a very important part of the equation for performing safe and effective squats. (In case you're wondering where your hip flexors are, they sit along the crease your body makes when you sit down.) Make sure to engage them throughout the squat. Not sure what engaging your hip flexors feels like? Use this simple partner exercise to help: Lie face up on the floor, and bring your knees to your chest with your legs about shoulder width apart. Place your fingers on your hip flexors. Have your partner wrap her fingertips around your feet, and, as she tries to pull your legs to a straight position, resist the pull using your hip flexor muscles. You want to feel your hip flexors this engaged while squatting.
To do the front squat with a kettlebell, get in the start position I describe in the "Settling into the right start position for the front squat" section; then follow these steps:
- Pick up your kettlebell with two hands using both sides of the handle and return to the start position, fully standing and holding the kettlebell close to the body at about chest height. Holding the kettlebell on both sides with two hands is called holding the bell by the horns.
- Sit back into your hips as you let your knees bend, keeping your spine neutral throughout the movement, and descend slowly by pulling yourself to the ground. Aim for getting your butt to make contact with the back of your heels in the bottom position of the rock-bottom squat. Keep the kettlebell in front of you, close to your body, and at chest height throughout the movement.
- Without pausing in the rock-bottom position, drive up through your heels, keeping your knees and core stable, to the fully standing position that I describe in Step 1; make sure your spine is tall, and pinch your glutes at the top of the movement.
Repeat the front squat for ten repetitions.
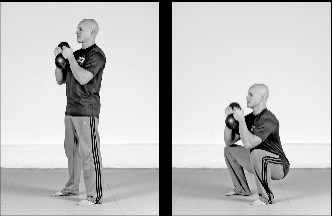
Figure 8-3: The front squat with the kettlebell.
<Tip>You should get a vigorous cardio workout when you do rock-bottom front squats. If you aren't out of breath after ten reps, make sure the kettlebell size you're using is challenging enough.
Advanced StuffIf you can get to rock-bottom position with good form, "rack" the kettlebell (see the later section "The rack position" for instructions), and perform ten repetitions on each side. Your core has to work a lot harder to stabilize your body while squatting when you aren't holding the kettlebell by the horns (because the weight is no longer evenly distributed). Also, try doing the double front squat by using two kettlebells of the same size in the rack position (left and right) for even more of a core, leg, and glute challenge.
Sarah Lurie, RKC, is the Founder and President of Iron Core Kettlebell Strength and Conditioning and the Author of Kettlebells For Dummies (June 28, 2010- John Wiley & Sons, Inc.)
Iron Core Kettlebell Strength and Conditioning
2949 Garnet Ave (Now inside World Gym!)
San Diego, CA 92109
858-551-2673
http://www.IronCoreKettlebells.com
Back